Settings of ScanPapyrus
Contents
The Settings window consists of a few parts. In each part, there is a Default button that resets all changes that you have made and restores the default settings.
General
The General tab allows you to change the general settings.
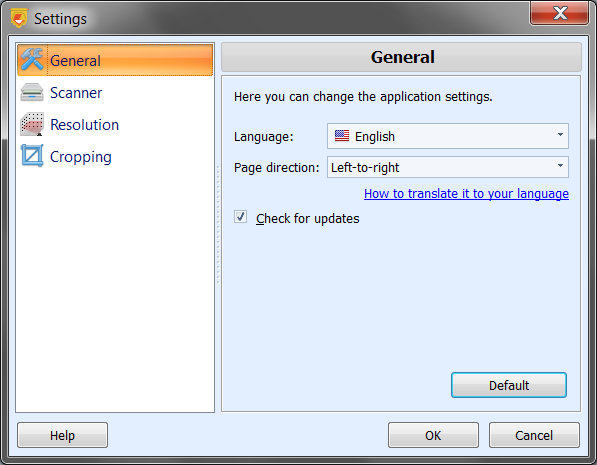
Use the Language drop-down list to select the desired language. The selected language will be used for the application’s user interface, including messages.

The Page direction listbox allows the user to select the page direction for the book: Left to right or Right to left.

This option is used when splitting a book spread into two pages. If the user selects Left to right, the left half of the book spread will become the first page in the document; if the user selects Right to left, the right half will become the first page. When scanning books in Arabic or Hebrew, select Right to left.
If the Check for updates checkbox is checked, the application will check for updates each time you launch it. If an update is available, the Update dialog box will appear, which you can use to download the new version of the application.

Scanner
The Scanner tab allows you to change scanning options and select the scan mode and method.
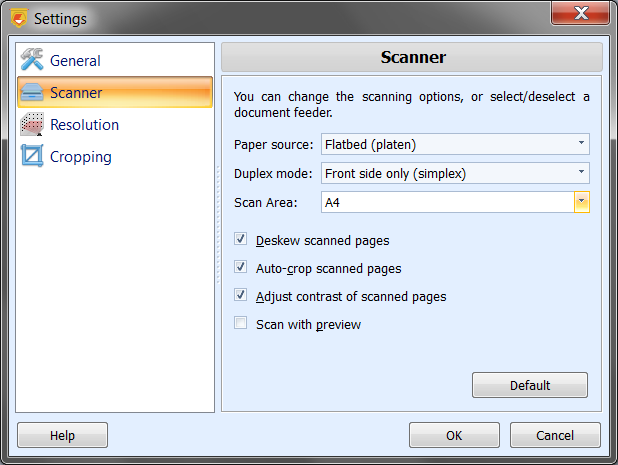
Different scanners may use different methods to feed pages for scanning. If you have a simple flatbed scanner, you put a page on the flatbed (“glass”) and close the lid that presses down the page. You may also have an ADF (automatic document feeder) scanner, which takes several pages and feeds the paper one page at a time. ADF scanners may also have a flatbed for manual scanning.
The Paper Source listbox allows you to define how pages will be fed to the scanner:

Flatbed (platen) – The flatbed will be used.
Automatic feeder (ADF) – The automatic document feeder will be used.
Automatic paper detection – If there is any paper in the automatic document feeder, the ADF will be used, otherwise the flatbed will be used. This feature may not work as intended if your ADF scanner doesn’t have a paper sensor in the automatic document feeder.
The Duplex Mode listbox is intended for scanners that support duplex (two-side) scanning.

Front side only (simplex) – Only the front side of the page will be scanned.
Both sides (duplex) – Both sides of the page will be scanned.
The Scan area list allows you to specify the scanner glass area to be scanned. By default, the scanner will scan the entire glass area. But you can limit that area to speed up the scanning process; in that case, the scanning head will have to travel a smaller distance.

The following options are available:
- Entire area – The entier scanner glass area will be scanned.
- A4 – Only an area equal to one A4 page will be scanned.
- Letter – Only an area equal to one Letter page will be scanned.
- Legal – Only an area equal to one Legal page will be scanned.
- A5 – Only an area equal to one A5 page will be scanned.
- A6 – Only an area equal to one A6 page will be scanned.
If the Deskew scanned pages checkbox is checked, the application will automatically fix any skewed pages. Any scanned page is usually slightly skewed to the right or to the left. If this option is turned on, the page will be straightened.

If the Auto-crop scanned pages checkbox is checked, the application will automatically cut off unnecessary margins. Both black stripes from the scanner lid’s edges and the original document’s margins will be removed. If this option is turned on, all margins will be removed (top, bottom, left, and right), so that only useful information remains. This option also cuts off black stripes caused by scanning with the lid ajar.

If the Adjust contrast of scanned pages checkbox is checked, the application will automatically adjust the contrast to make the background whiter, and the letters and other characters darker. This option is only useful when scanning text documents in the black-and-white or grayscale scan mode. When used with the color scan mode, it distorts the original color, so do not use it when scanning full-color images. Nonetheless, this option may be useful for scanning black-and-white text pages that contain small pictures here and there (like newspaper pages).

If the Scan with preview checkbox is checked, a system preview window will open when scanning. The window’s appearance depends on the scanner’s driver and may be different for different scanner models. The preview window allows you to use the specific scanner’s features. After scanning, the image will be passed to ScanPapyrus, and the application will perform automatic cropping and automatic contrast adjustment (provided that those options are turned on).

Resolution
The Resolution tab allows you to set a resolution for each quality preset.
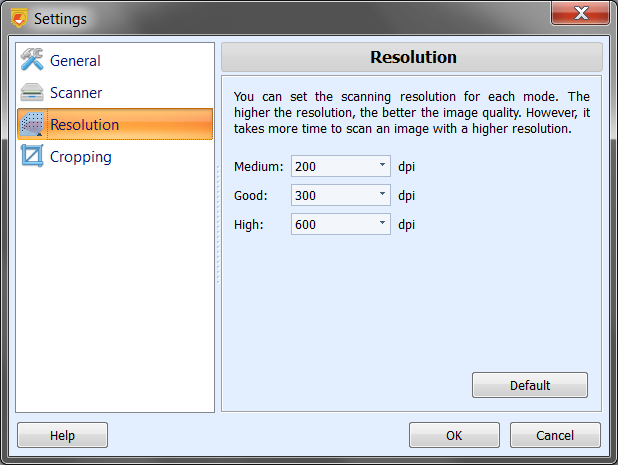
Medium – 200 DPI by default
Good – 300 DPI by default
High – 600 DPI by default
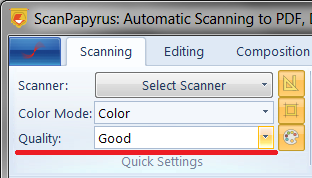
These modes are accessible via the Quick Settings section (the “Quality” control).
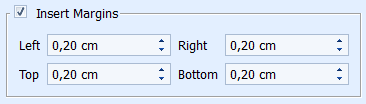
Cropping
The Cropping tab allows you to add margins to a page after automatic cropping. In the auto-cropping mode, the application cuts off all margins, keeping only useful information. Sometimes it may cut the page too close to the text, which makes the document harder to read. To avoid this problem, the application allows you to add margins to the scanned and auto-cropped page.
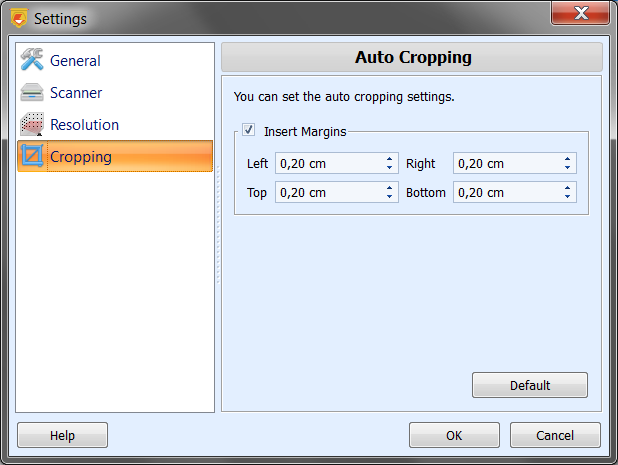
If the Insert Margins checkbox is checked, the application will add margins to the page after auto-cropping. You can add any margins (top, bottom, left, and right). The size of the margin is measured in centimeters. You can change the size with the step 0.2 cm.
See also
Main window
Automatic scanning
NAVIGATE
ABOUT US
ScanPapyrus Team develops home and office applications for Windows. Our programs are known for their high quality, user-friendliness and comprehensive design.
PARTNERS
![]()